Midnight local network
The local network is a standalone tool for running a local Midnight development network and funding test wallets.
This guide walks you through the process of setting up a local Midnight network and funding test wallets in the undeployed network.
Prerequisites
- Docker Desktop
- Node.js >= 22.0.0
Installation
To get started, clone the Midnight local network repository:
git clone https://github.com/midnightntwrk/midnight-local-dev.git
cd midnight-local-dev
Install the dependencies:
npm install
Network services
The local network runs three Docker containers on the following ports:
| Service | Container Name | Port | URL |
|---|---|---|---|
| Midnight Node | midnight-node | 9944 | http://localhost:9944 |
| Indexer (GraphQL) | midnight-indexer | 8088 | http://localhost:8088/api/v3/graphql |
| Indexer (WebSocket) | midnight-indexer | 8088 | ws://localhost:8088/api/v3/graphql/ws |
| Proof Server | midnight-proof-server | 6300 | http://localhost:6300 |
All services use the undeployed network ID with the dev node preset.
Docker images
The standalone.yml file in the root of the repository defines the Docker images and specific versions pulled when you start the local network.
| Service | Image | Version |
|---|---|---|
| Node | midnightntwrk/midnight-node | 0.20.0 |
| Indexer | midnightntwrk/indexer-standalone | 3.0.0 |
| Proof Server | midnightntwrk/proof-server | 7.0.0 |
Start the local network
Once the installation is complete, start the local network by running the following command:
npm start
This single command does the following:
- Pull the latest Docker images for the Midnight node, indexer, and proof server.
- Start all three containers with health checks.
- Initialize the genesis master wallet (seed
0x00...001) which holds all minted NIGHT tokens. - Register DUST for the master wallet (required to pay transaction fees).
- Display the master wallet balance.
- Present an interactive menu for funding wallets in the undeployed network.
Once running, you'll see:
Choose an option:
  [1] Fund accounts from config file (NIGHT + DUST registration)
  [2] Fund accounts by public key (NIGHT transfer only)
  [3] Display master wallet balances
  [4] Exit
>
Fund wallets
The local network provides two options for funding wallets:
- Fund from a config file
- Fund by public key
Each funding operation transfers 50,000 tNIGHT from the genesis master wallet. You can fund up to 10 accounts per operation.
Option 1: Fund from a config file
The config option handles wallet operations such as generating the wallet seed from mnemonic, transferring tNIGHT to the unshielded address, syncing the wallet, and registering tNIGHT for DUST generation.
It pulls wallet information from a config file, which is a JSON file with the following structure:
{
  "accounts": [
    {
      "name": "Alice",
      "mnemonic": "abandon abandon abandon abandon abandon abandon abandon abandon abandon abandon abandon abandon abandon abandon abandon abandon abandon abandon abandon abandon abandon abandon abandon art"
    }
  ]
}
Here's a breakdown of the fields:
| Field | Type | Description |
|---|---|---|
accounts | array | List of accounts to fund (max 10) |
accounts[].name | string | Display name for logging |
accounts[].mnemonic | string | BIP39 mnemonic phrase (24 words) |
An example file is provided at accounts.example.json. Copy the file to accounts.json and edit it to add your wallet mnemonics.
cp accounts.example.json accounts.json
After editing the file, select option [1] Fund accounts from config file (NIGHT + DUST registration) from the interactive menu.
You are prompted to enter the path to the config file.
> 1
Path to accounts JSON file: ./accounts.json
The tool funds the wallets from the config file.
Option 2: Fund by public key
The public key option allows you to fund wallets by their Bech32 addresses. You can fund up to 10 wallets at a time.
Select option [2] Fund accounts by public key (NIGHT transfer only) from the interactive menu.
You are prompted to enter the Bech32 addresses of the wallets you want to fund, separated by commas.
> 2
Enter Bech32 addresses (comma-separated): mn1q..., mn1q...
Each address receives 50,000 tNIGHT. Recipients must register for DUST generation themselves before they can pay transaction fees.
If you're using a custom wallet, see our guide to learn how to programatically register for DUST generation.
Connect a DApp
Once the network is running, any Midnight DApp can connect using the standard localhost endpoints.
Here's an example of how to connect a DApp to the local network:
import { setNetworkId } from '@midnight-ntwrk/midnight-js-network-id';

setNetworkId('undeployed');

const config = {
  indexer: 'http://127.0.0.1:8088/api/v3/graphql',
  indexerWS: 'ws://127.0.0.1:8088/api/v3/graphql/ws',
  node: 'http://127.0.0.1:9944',
  proofServer: 'http://127.0.0.1:6300',
  networkId: 'undeployed',
};

// Use these endpoints with the Midnight wallet SDK, contract deployment, and other DApp operations
Run the network standalone
If you only need the Docker containers running without the interactive menu for wallet initialization or funding, you can use Docker Compose directly:
docker compose -f standalone.yml up -d
To check the status of the containers:
docker compose -f standalone.yml ps
To view the logs:
docker compose -f standalone.yml logs -f
This is useful when:
- Your DApp handles its own wallet initialization and funding.
- You want to keep the network running across multiple test sessions.
- You're debugging container-level issues.
In this mode, you must handle genesis wallet funding and DUST registration yourself.
Troubleshoot
Below are some of the common issues that you might encounter and how to fix them.
Port already in use
Error: Bind for 0.0.0.0:9944 failed: port is already allocated
Another process or a previous run is using the port. Stop it:
docker compose -f standalone.yml down
# or find and kill the process
lsof -i :9944
Invalid wallet address
If you receive an error like this:
Operation failed: Expected undeployed address, got Preprod address
It means you're trying to fund a wallet with a Preprod address. You need to use the Undeployed network address instead.
If you're using the Lace wallet, you need to configure the wallet to use the Undeployed network.
- In the Lace wallet extension, navigate to the Settings page and click Midnight under the Wallet section.
- Select the Undeployed network and click Save configuration.
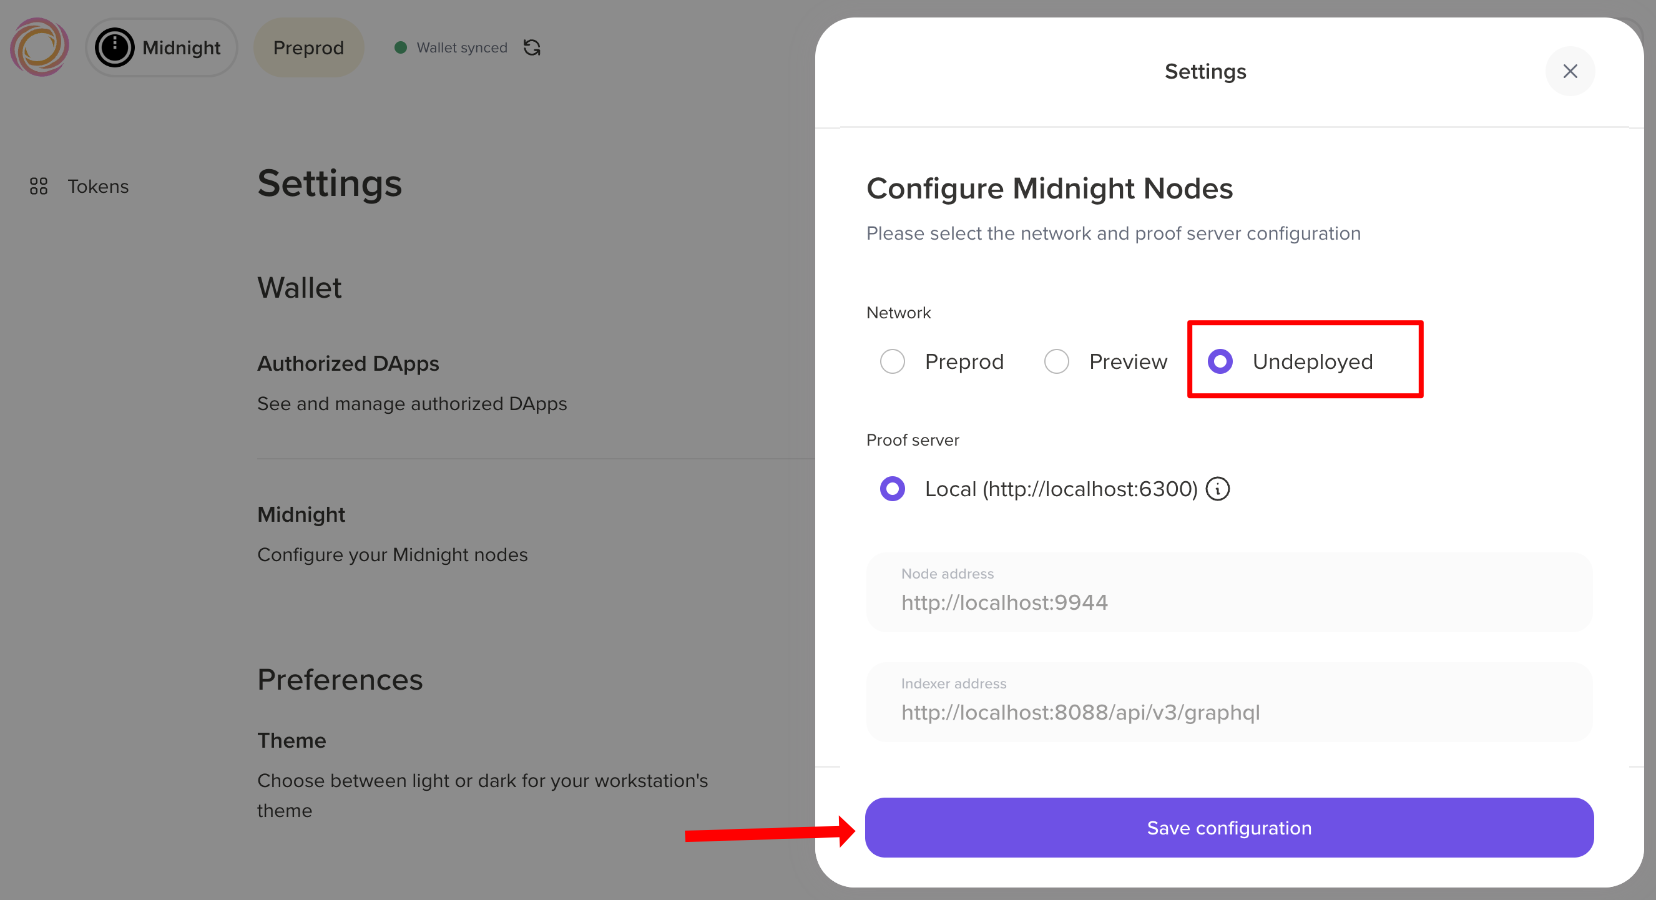
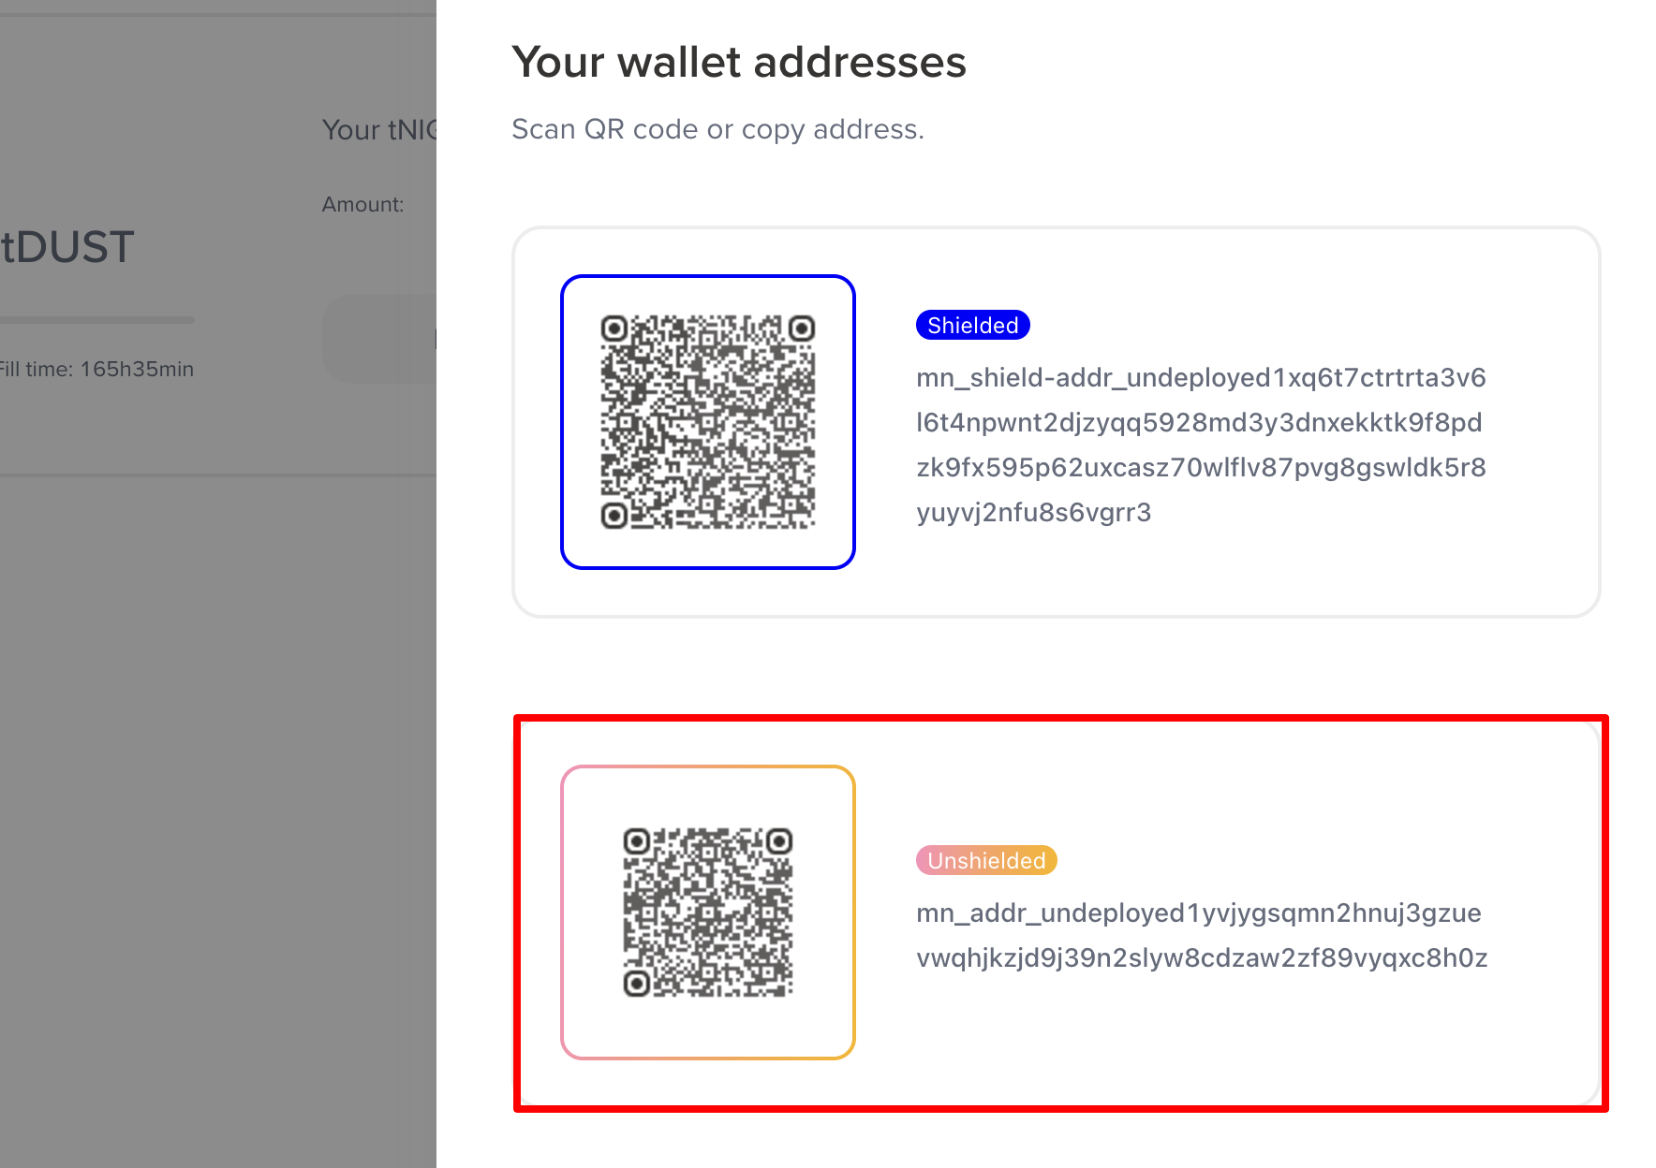
After that, you'll see your wallet addresses for the local Undeployed network. Make sure to use the Unshielded wallet address for the local Undeployed network.
Containers not starting
Check Docker is running and you have access to the Midnight Docker registry:
docker compose -f standalone.yml pull
docker compose -f standalone.yml up
Watch the logs for specific errors:
docker compose -f standalone.yml logs -f node
docker compose -f standalone.yml logs -f indexer
docker compose -f standalone.yml logs -f proof-server
Wallet sync takes too long
The indexer needs time to catch up with the node after startup. If the sync seems stuck:
- Check the indexer logs:
docker compose -f standalone.yml logs -f indexer - Verify the node is producing blocks:
curl http://localhost:9944/health - Set
DEBUG_LEVEL=debugin.envfor more detailed wallet logs
Next steps
Now that you have a local network running, you can start building your DApp. See our guide to learn how to deploy a contract to the Midnight blockchain.